You want your vehicle to look its best while avoiding costly paint repairs, and paint protection film (PPF) gives you a durable, nearly invisible shield against stone chips, insect stains, and everyday abrasions. PPF preserves your paint’s finish without altering its appearance, so you keep showroom-quality protection and resale value.
This article breaks down why PPF may suit your needs, what real benefits to expect, and how professional installation works so you can decide with confidence. Keep reading to learn how PPF protects your investment and what to expect from the installation process.
Benefits of Paint Protection Film
You get targeted protection against everyday hazards, long-term preservation of your vehicle’s surface, and defense from sun and chemical damage. Each benefit focuses on preserving finish, reducing repair needs, and maintaining appearance.
Scratch and Chip Resistance
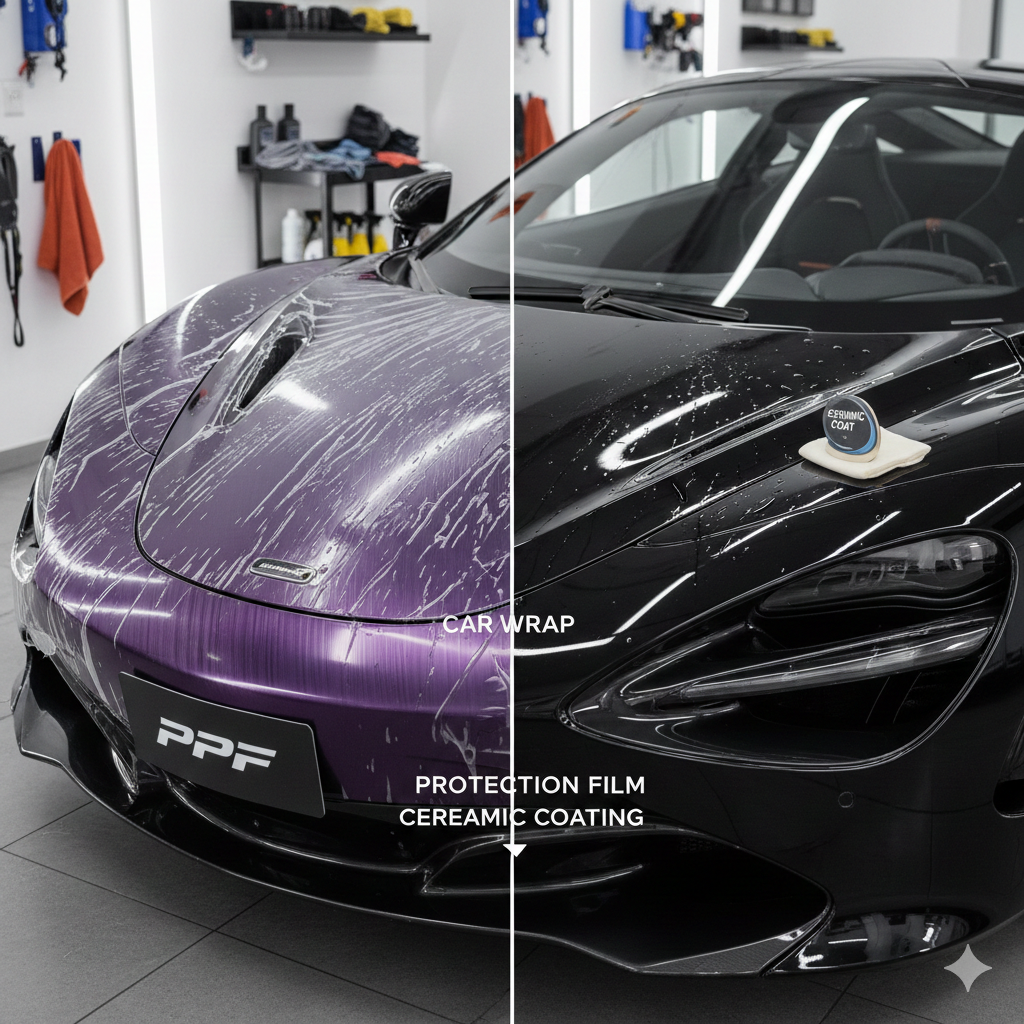
Paint protection film (PPF) is a thick, impact-absorbing polyurethane layer applied to vulnerable panels like the hood, front bumper, and fenders. It shields your paint from stone chips, gravel, and minor abrasions that would otherwise require touch-ups or repainting.
Many films include a self-healing topcoat that smooths light swirl marks and fine scratches with heat from the sun or an engine. This reduces the frequency of clay, polish, or wetsanding. For deeper gouges, PPF prevents paint penetration, so repairs are often limited to the film rather than the underlying paint.
When comparing options, look for film thickness (typically 6–8 mil for full protection) and manufacturer scratch-resistance ratings. Proper professional installation reduces edges that can lift and trap dirt, preserving protective performance.
Preserving Vehicle Resale Value
PPF helps maintain factory paint integrity on high-wear areas, which buyers and appraisers inspect closely. You avoid common depreciation triggers such as rock chips on the hood and bumper damage, which often lower trade-in and private-sale values.
Keeping original paint intact also simplifies pre-sale preparation. Instead of paying for paint correction or panel replacement, you may only need to remove yellowed film or recondition remaining film for presentation. Documenting professional PPF installation and warranty transferability further strengthens buyer confidence.
For leased vehicles, OEM-level PPF on exposed panels can help you meet return condition requirements and avoid excessive wear charges at lease-end.
UV and Chemical Protection
PPF contains UV inhibitors that slow paint oxidation and clearcoat fade, particularly on horizontal surfaces exposed to direct sunlight. This extends the time before you need aggressive polishing or repainting to restore color depth.
The film also acts as a barrier against environmental chemicals: bird droppings, insect acids, tree sap, road salts, and fuel splashes. These contaminants can etch or stain clearcoat quickly; PPF prevents immediate chemical contact with the factory finish. Clean the film with pH-neutral automotive shampoos and avoid harsh solvents to preserve both clarity and protective properties.
Paint Protection Film Installation Process
This section explains the key steps you must take to prepare the surface, apply film accurately, and care for the film after installation. Follow specific cleaning, application, and curing actions to reduce bubbles, lifting, and premature wear.
Preparation and Surface Cleaning
Clean thoroughly to remove wax, oils, tar, and road film before you start. Wash the panel with automotive shampoo, then use an isopropyl alcohol (IPA) wipe or dedicated surface prep solution (70–90% IPA) to remove remaining residues. Work in a dust-free, climate-controlled space between 60–80°F (15–27°C) when possible.
Inspect paint for chips, rust, or raised imperfections and repair them prior to film application. Dry the panel with a clean microfiber towel, and use compressed air to blow out gaps between trim, seams, and around emblems. Mask off areas you will not cover to avoid accidental adhesive contact.
Application Techniques
Mix a slip solution (water + 0.5–1.25 ml mild baby shampoo per liter as a starting point) and a tack solution (water + small amount of IPA) in labeled spray bottles. Keep both film and adhesive wet while positioning the film; this reduces friction and allows precise alignment.
Use heat (low-temperature heat gun or infrared lamp) to relax the film for complex curves; heat the film evenly and stretch minimally to avoid distortion. Squeegee from the center outward with firm, overlapping passes at a 45° angle to push out liquids and air. Trim excess with a sharp, new blade and cut slightly outside the edge when working near trim, then tuck the edge if required.
Address edge sealing: dry edges fully and apply edge sealer if the manufacturer recommends it. For bulk installs, wipe off any excess slip at anchor points and dry those areas to ensure adhesion.
Aftercare Recommendations
Allow the adhesive to cure before heavy washing; avoid automatic car washes and high-pressure nozzles for 5–7 days. Hand wash gently with pH-neutral automotive soap and a soft microfiber mitt starting 48–72 hours after installation.
Avoid waxing the film for 30 days and do not use silicone-based or abrasive polishes. Inspect edges and seams weekly for the first month; small lifting can often be corrected by cleaning the area, applying light heat, and pressing the edge back down. If you notice persistent lifting or contamination under the film, contact a professional installer for repair to prevent contamination or water ingress.


Leave a Reply